

How to Reduce Washing Machine Noise During the Spin Cycle
A washing machine will never be completely silent, especially when the drum reaches a high spin speed. But loud thumping, rattling, vibration, or a sudden increase in noise usually means there is something worth checking.
Why Does a Washing Machine Get So Loud During the Spin Cycle?
The spin cycle is the point when your washing machine rotates the drum quickly to remove water from wet laundry. That combination of speed and weight naturally creates more movement than the slower parts of the wash cycle.
Some sound is normal. The problem starts when normal spinning is joined by excessive vibration, repeated thumping, cabinet rattling, movement across the floor, or a new mechanical noise.
The important thing is to identify where the sound is coming from before trying to quiet it. A noisy laundry load needs a different fix from an unstable washer, and an unstable washer needs a different fix from an internal mechanical problem.
The practical goal: do not try to make the machine completely silent. Focus on reducing unnecessary noise caused by imbalance, rocking, poor floor contact, vibration transfer, and loose objects around the appliance.
Diagnose Before You Fix
First, Identify What Kind of Noise You Are Hearing
Different sounds point toward different areas of the washer setup. Listen carefully during the next cycle and note whether the sound comes from the load, the appliance cabinet, the floor, or inside the machine.
Rhythmic thumping
Often starts when wet laundry collects on one side of the drum. Pause the cycle and redistribute the load before checking anything else.
Rattling around the cabinet
Check baskets, shelves, hoses, hangers, cleaning supplies, and other objects that may be touching the washer and vibrating with it.
Heavy floor vibration
The washer may be transferring normal operating vibration into the floor. Check leveling, foot contact, and floor stability before adding vibration isolation.
Banging behind the machine
Inspect the drain and supply hoses. A loose hose can strike the back of the appliance or wall during a fast spin cycle.
Grinding, scraping, or a new mechanical sound
Stop treating the problem as ordinary vibration. Persistent internal noises may require model-specific troubleshooting or professional service.
Manufacturer sound guides can also help separate normal operating sounds from actual problems. For examples, see Samsung's washing machine noise guide and follow the instructions for your own washer model.
7 Ways to Reduce Washing Machine Noise During the Spin Cycle
Work through these fixes in order. The first few cost nothing and solve common setup problems that no accessory should be expected to hide.
Redistribute an unbalanced laundry load
A heavy item, tangled bedding, or a small number of wet garments can collect on one side of the drum. Pause the cycle, separate the items, and spread the load more evenly before restarting.
Avoid overloading the washer
A packed drum can make it harder for laundry to move and redistribute correctly. Follow the load limits and cycle instructions supplied for your specific machine.
Make sure the washer is properly level
Every foot should make firm contact with the floor. Check the appliance from side to side and front to back, then adjust the leveling feet according to the manufacturer's instructions.
Remove anything touching the appliance
Even a small amount of normal washer vibration can make nearby shelves, bottles, baskets, hoses, or cleaning tools rattle loudly. Create a small amount of clearance around the machine.
Check the installation if the washer is new
A recently installed front-loading washer should be checked for any shipping hardware that the manufacturer requires to be removed. Never assume the installation was completed correctly.
Check the floor and appliance contact points
The washer should sit on a stable surface without rocking. Debris, uneven contact, a slippery floor, or poor support under one foot can make ordinary spinning sound much worse.
Add grip and vibration isolation under the feet
Once the washer is correctly installed and level, anti-vibration pads can help reduce movement and some of the vibration being transferred through the appliance feet into the floor.
Official manufacturer guidance follows the same basic logic. Whirlpool's spin-cycle noise guidance recommends checking washer balance and leveling when investigating excessive noise.
Why Leveling Makes Such a Big Difference to Washer Noise
A washer can appear almost level and still rock slightly when pressure is applied to one corner. At low speed, that small amount of movement may be difficult to notice. At high spin speed, it can turn into repeated vibration and noise.
Before the next cycle, gently test the appliance at the corners while it is turned off. The machine should feel firmly supported rather than rocking between two feet.
Then check the washer from side to side and front to back. Adjust the feet only according to the instructions for your exact model and secure any locking nuts or adjustment mechanisms the manufacturer specifies.
Do not skip this step: adding pads beneath an unstable washer may change the sound, but it does not correct the underlying leveling problem.
For the complete process, read our step-by-step guide on how to level a washing machine properly and reduce excessive vibration .
Fix the Load First
A Quiet Washer Can Still Get Loud With the Wrong Load
Not every noisy spin cycle means the machine has a permanent problem. The laundry inside the drum can temporarily create a large imbalance.
Check Inside the Drum
- One heavy item spinning by itself.
- Sheets or bedding tangled into one large mass.
- A very small load unable to distribute evenly.
- A drum filled beyond the recommended capacity.
- Heavy and lightweight items behaving very differently.
Pause and Redistribute
- Stop the cycle safely.
- Separate tangled items.
- Redistribute the laundry around the drum.
- Follow the correct cycle instructions.
- Restart and listen for the same noise.
If the washer becomes quiet after the load is redistributed, the noise was probably related to that particular cycle rather than a permanent floor or appliance problem.
Sometimes the Washer Is Not the Thing Making the Noise
A washing machine can act like a vibration source for everything around it. A small amount of normal movement may cause another object to make far more noise than the appliance itself.
Before changing the washer setup, inspect the surrounding area during a cycle.
Check the drain hose
A loose hose may strike the wall or the back of the washer during the spin cycle.
Move baskets and cleaning products away
Plastic containers and lightweight objects can create a surprising amount of rattling when they touch a vibrating surface.
Check nearby shelves and tools
Hangers, brooms, racks, metal tools, and loose shelf items can vibrate in rhythm with the washer.
Check cabinet and wall clearance
The washer should not repeatedly strike nearby furniture, cabinets, or walls while operating.
For example, GE Appliances notes that a drain hose can create a banging sound during spinning when it strikes the back of the machine.
After the Basic Checks
Reduce Movement and Vibration Transfer at the Washer Feet
Once the load, installation, leveling, and surrounding area have been checked, the connection between the washer feet and the floor becomes the next area to improve.
A hard-spinning washer can transfer vibration through its feet and into the floor. On smooth surfaces, limited grip may also allow small amounts of movement that create extra noise.
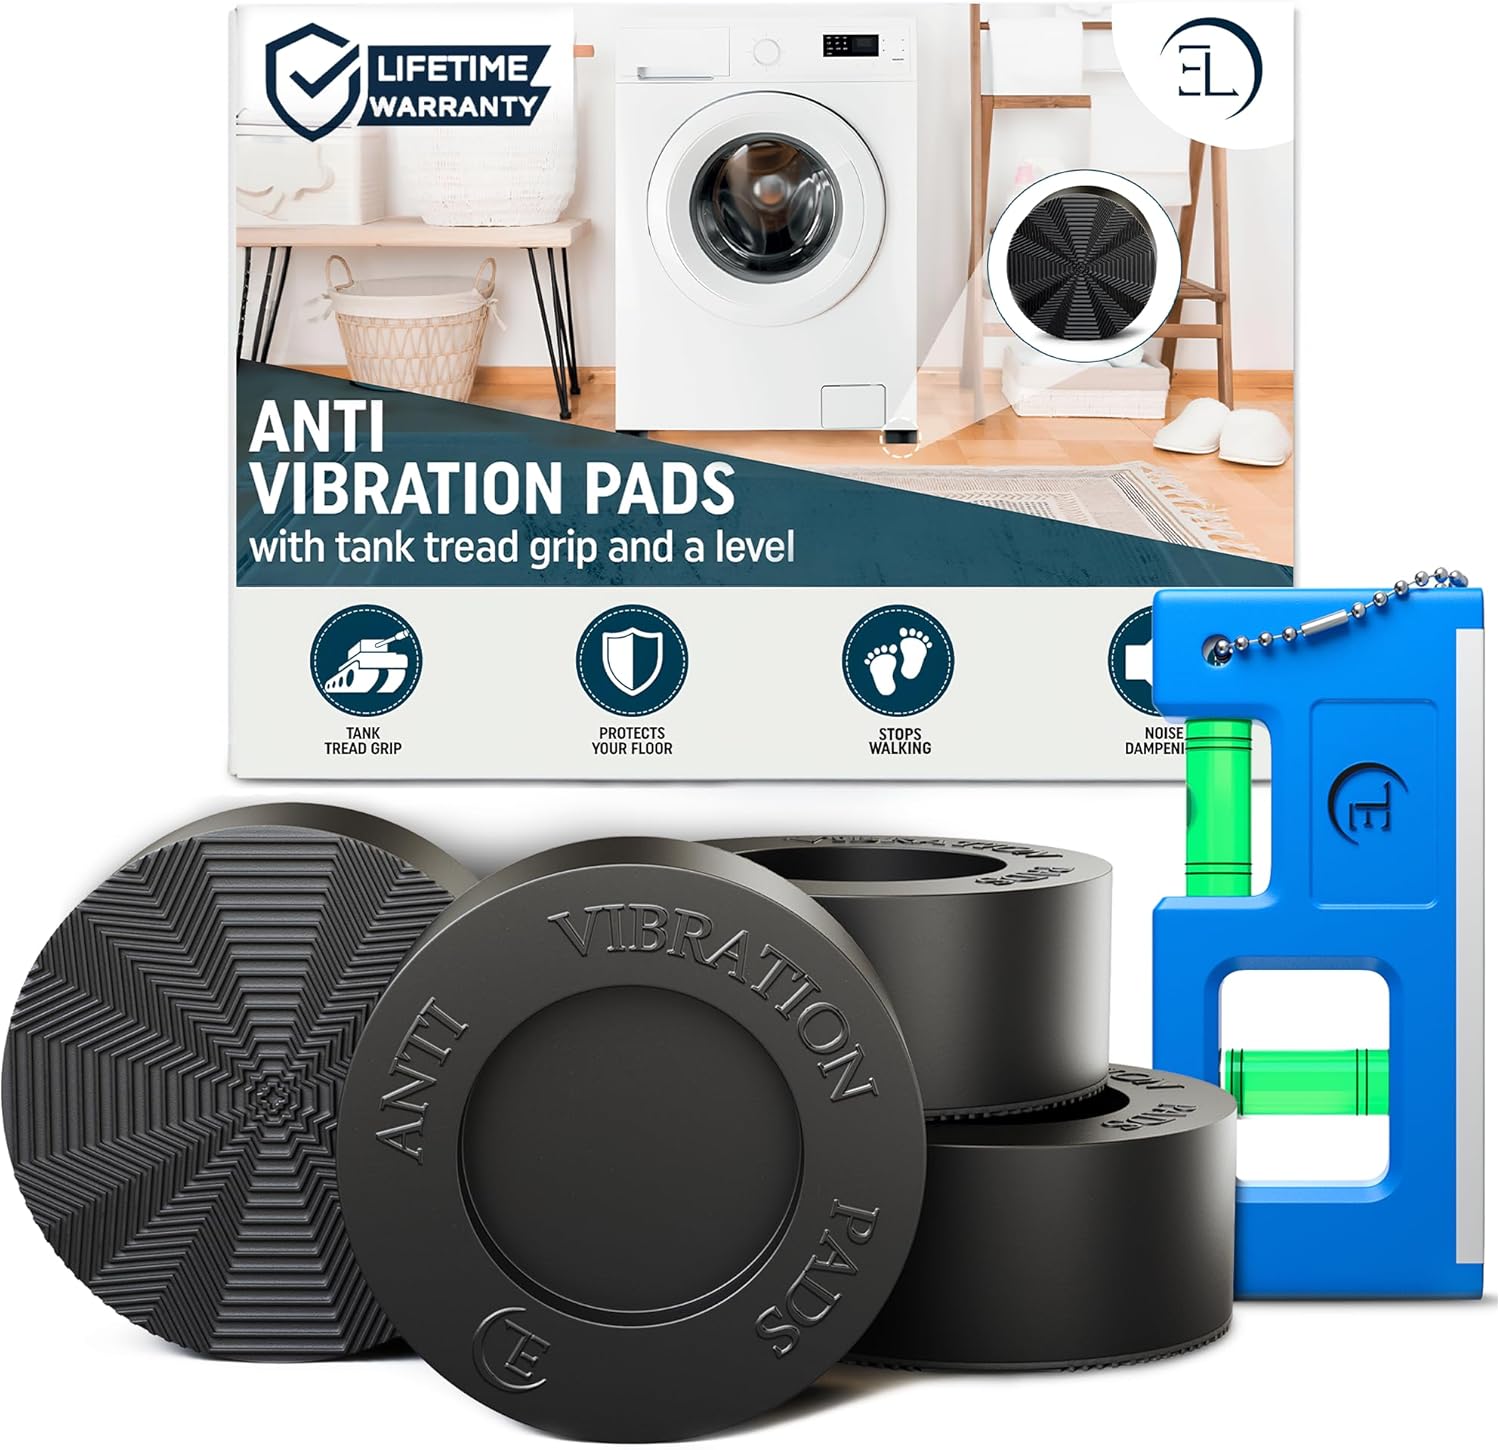
ELEON Anti Vibration Pads for Washing Machines, Dryers & Appliances
ELEON Anti Vibration Pads add a durable rubber contact layer beneath each appliance foot to help reduce movement, floor vibration, and unnecessary spin-cycle noise after the washer has been correctly installed and leveled.
- Includes 4 anti-vibration pads and 1 magnetic level.
- Tank-tread grip pattern helps limit side-to-side movement.
- 3-inch total diameter creates a wider base under each foot.
- 1.75-inch opening fits many standard washer and dryer feet.
- 0.95-inch lift adds grip, clearance, and floor separation.
Best-results order: balance the load → remove rattles → check installation → level the washer → eliminate rocking → install the pads → run a test cycle.
Anti-vibration pads are also used by major appliance manufacturers as a way to reduce vibration transfer. See GE Appliances' guidance on washer and dryer anti-vibration pads for another example of the same basic approach.
What Kind of Washing Machine Noise Can Anti-Vibration Pads Help With?
Pads are most useful when the noise is connected to movement or vibration passing through the washer feet. They are not a universal fix for every sound a washing machine can make.
Movement and Floor Vibration
- Vibration transferring into a hard floor.
- Minor shifting during heavy spin cycles.
- Noise created by washer movement.
- Limited grip on smooth flooring.
- Rattling caused by a washer changing position.
Internal or Installation Faults
- Shipping hardware left installed.
- A repeatedly unbalanced laundry load.
- A washer that is not properly level.
- Grinding or scraping from inside the appliance.
- Loose or damaged mechanical components.
For a fuller product explanation, read our guide: Do Anti-Vibration Pads Work for Washing Machines?
Test One Change at a Time
The Best Way to Find Out What Is Actually Making the Washer Noisy
Changing several things at once makes it difficult to know what solved the problem. A simple test order makes troubleshooting much clearer.
Run a normal load and listen carefully
Note when the noise begins and whether it changes as the spin speed increases.
Correct the laundry load
Redistribute tangled or uneven items and repeat the test.
Remove nearby rattles
Move anything touching the machine and secure loose hoses or objects.
Check for rocking and level the washer
Confirm firm contact at all four feet before testing again.
Improve grip and vibration isolation
If the remaining noise comes from floor vibration or minor movement, install suitable anti-vibration pads and repeat the same type of cycle.
The improvement does not need to be complete silence. A successful result may simply be less floor vibration, less side-to-side movement, fewer rattles, and a noticeably calmer spin cycle.
Still Noisy? Match the Next Guide to the Actual Problem
Spin-cycle noise often overlaps with movement and vibration, but the strongest next step depends on what the washer is actually doing.
The washer is moving across the floor
Read our guide on how to stop a washing machine from walking during the spin cycle .
The machine is shaking severely
Use the broader troubleshooting guide on why a washing machine may shake violently .
The washer rocks while turned off
Start with properly leveling the washing machine before buying any accessory.
You are comparing different vibration solutions
See our comparison of washing machine anti-vibration pads vs mats .
Know When to Stop Troubleshooting
When Loud Spin-Cycle Noise May Need Professional Attention
A washer that has become suddenly louder should not automatically be treated as a floor-vibration problem.
Stop using the machine and seek qualified help if the noise is severe, persistent, or accompanied by warning signs such as:
- Grinding or scraping from inside the appliance.
- A visibly loose or abnormal drum.
- Water leaking from the washer.
- Electrical or burning smells.
- Repeated violent impacts inside the cabinet.
- The machine failing to complete the cycle normally.
- A sudden major change in the way the washer sounds or moves.
Important: anti-vibration pads can improve grip and vibration isolation. They should never be used to hide a washer that appears mechanically damaged or unsafe.
Washing Machine Spin-Cycle Noise: FAQs
The Bottom Line
Quiet the Cause, Not Just the Sound.
Start with the laundry load, remove nearby rattles, check the installation, and make sure the washer is properly level. Once the machine is stable, improving grip and vibration isolation under the feet can help create a calmer, quieter spin cycle.