

How to Install Anti-Vibration Pads Under a Washing Machine
Anti-vibration pads can help reduce washer movement, floor vibration, noise, and scuffing—but only when the machine is installed correctly. The pads should support a stable, properly leveled washer, not hide an underlying setup or mechanical problem.
The basic rule is simple: check the washer first, level it, eliminate rocking, place one pad securely under every foot, and then run a controlled test cycle.
Installing the Pads Is Easy. Preparing the Washer Matters More.
The physical act of placing four pads beneath a washing machine is straightforward. The part that determines whether the installation works well is everything you do before and immediately after that step.
A washer that rocks when turned off, has loose leveling feet, sits on an unstable floor, still has shipping hardware installed, or contains a mechanical fault may continue to shake even after anti-vibration pads are added.
Manufacturers consistently emphasize proper leveling and firm contact at all four feet when troubleshooting vibration. LG, for example, advises adjusting the feet until rocking is minimized, tightening the locknuts, and then testing the washer during a spin cycle.
That means anti-vibration pads should be treated as part of a complete stability setup—not as the first and only fix.
To install anti-vibration pads correctly, unplug the washer, confirm the machine is stable and level, safely raise one side at a time, position one pad beneath each foot, lower the washer carefully, recheck the level, and run a test cycle.
Prepare Everything Before Moving the Washer
A little preparation makes the installation safer and helps prevent the common problem of moving a heavy appliance halfway through the job and then realizing something is missing.
- A complete set of four anti-vibration pads
- A bubble level
- Work gloves with a secure grip
- A second person to help stabilize the appliance
- The washing machine's installation instructions
- Enough space to reach all four appliance feet safely
How to Install Anti-Vibration Pads Step by Step
The goal is not simply to get rubber underneath the machine. Every washer foot should end up centered, firmly supported, and stable after the appliance is lowered back into place.
Turn off and unplug the washing machine
Switch the washer off and disconnect it from the electrical outlet before repositioning it. Make sure the machine has completed its cycle and contains no standing water.
The washer should not be operating while you are checking the feet, moving the appliance, or working close to the base.
Move the washer away from nearby walls or cabinets
Create enough working room to reach the appliance feet without forcing yourself into a narrow space. Move the washer only as far as necessary and avoid stretching, twisting, pinching, or disconnecting hoses unintentionally.
Check behind the machine before moving it. Water-supply lines, drain hoses, and the electrical cord should all have enough safe movement for the position change.
Inspect the floor beneath the washer
Look for dirt, detergent residue, moisture, debris, or anything that could reduce grip. The floor should be clean and dry before the pads are installed.
Also look for cracked tile, damaged flooring, a soft area, or obvious unevenness. Anti-vibration pads can improve contact and isolation, but they cannot make a structurally unstable floor rigid.
Check whether the washer rocks while turned off
Place your hands on opposite top corners and gently test the machine for movement. Repeat from the other direction.
A correctly supported washer should feel solid rather than pivoting from one foot to another. If the machine rocks before the pads are installed, correct that problem first.
Level the washer from side to side and front to back
Place a bubble level on a suitable flat surface of the appliance and check both directions. Follow the washer manufacturer's instructions for adjusting the leveling feet.
Make small adjustments rather than extending the feet farther than necessary. The objective is to create firm contact at all four corners while keeping the cabinet level.
Tighten any locking hardware specified by the manufacturer once the adjustment is complete.
Position the first pair of anti-vibration pads
With another person helping stabilize the washer, carefully create only the amount of clearance needed to place the pads beneath the first pair of feet.
Do not reach beneath an unsupported appliance. Use a safe positioning method appropriate for the weight and design of your washing machine.
Place each pad in the correct orientation and make sure the washer foot will sit in the center of the supporting area.
Lower the washer carefully onto the pads
Lower the appliance slowly while watching the feet. Each foot should settle securely into its pad rather than landing on an edge.
Stop and reposition the pad if necessary. A rushed installation can leave one foot partly supported, which may introduce instability instead of reducing it.
Repeat the process for the remaining two feet
Install the second pair using the same controlled process. When finished, all four washer feet should be supported by their own individual pads.
Visually inspect each corner before moving on. None of the feet should be sitting outside the intended support area.
Recheck the level after installation
Adding pads changes the appliance's relationship with the floor, so the setup should be checked again after all four pads are installed.
Test side to side, front to back, and for corner-to-corner rocking. Do not assume that the washer remains level simply because it was level before being moved.
Reconnect the washer and run a controlled test cycle
Move the machine back into its operating position without pushing it directly against a wall or neighboring appliance. Check that hoses and the power cord remain correctly positioned.
Reconnect the washer and run a suitable test cycle while staying nearby. Watch the machine as it transitions into the spin phase.
The washer should remain firmly supported without rocking, travelling across the floor, or showing violent movement.
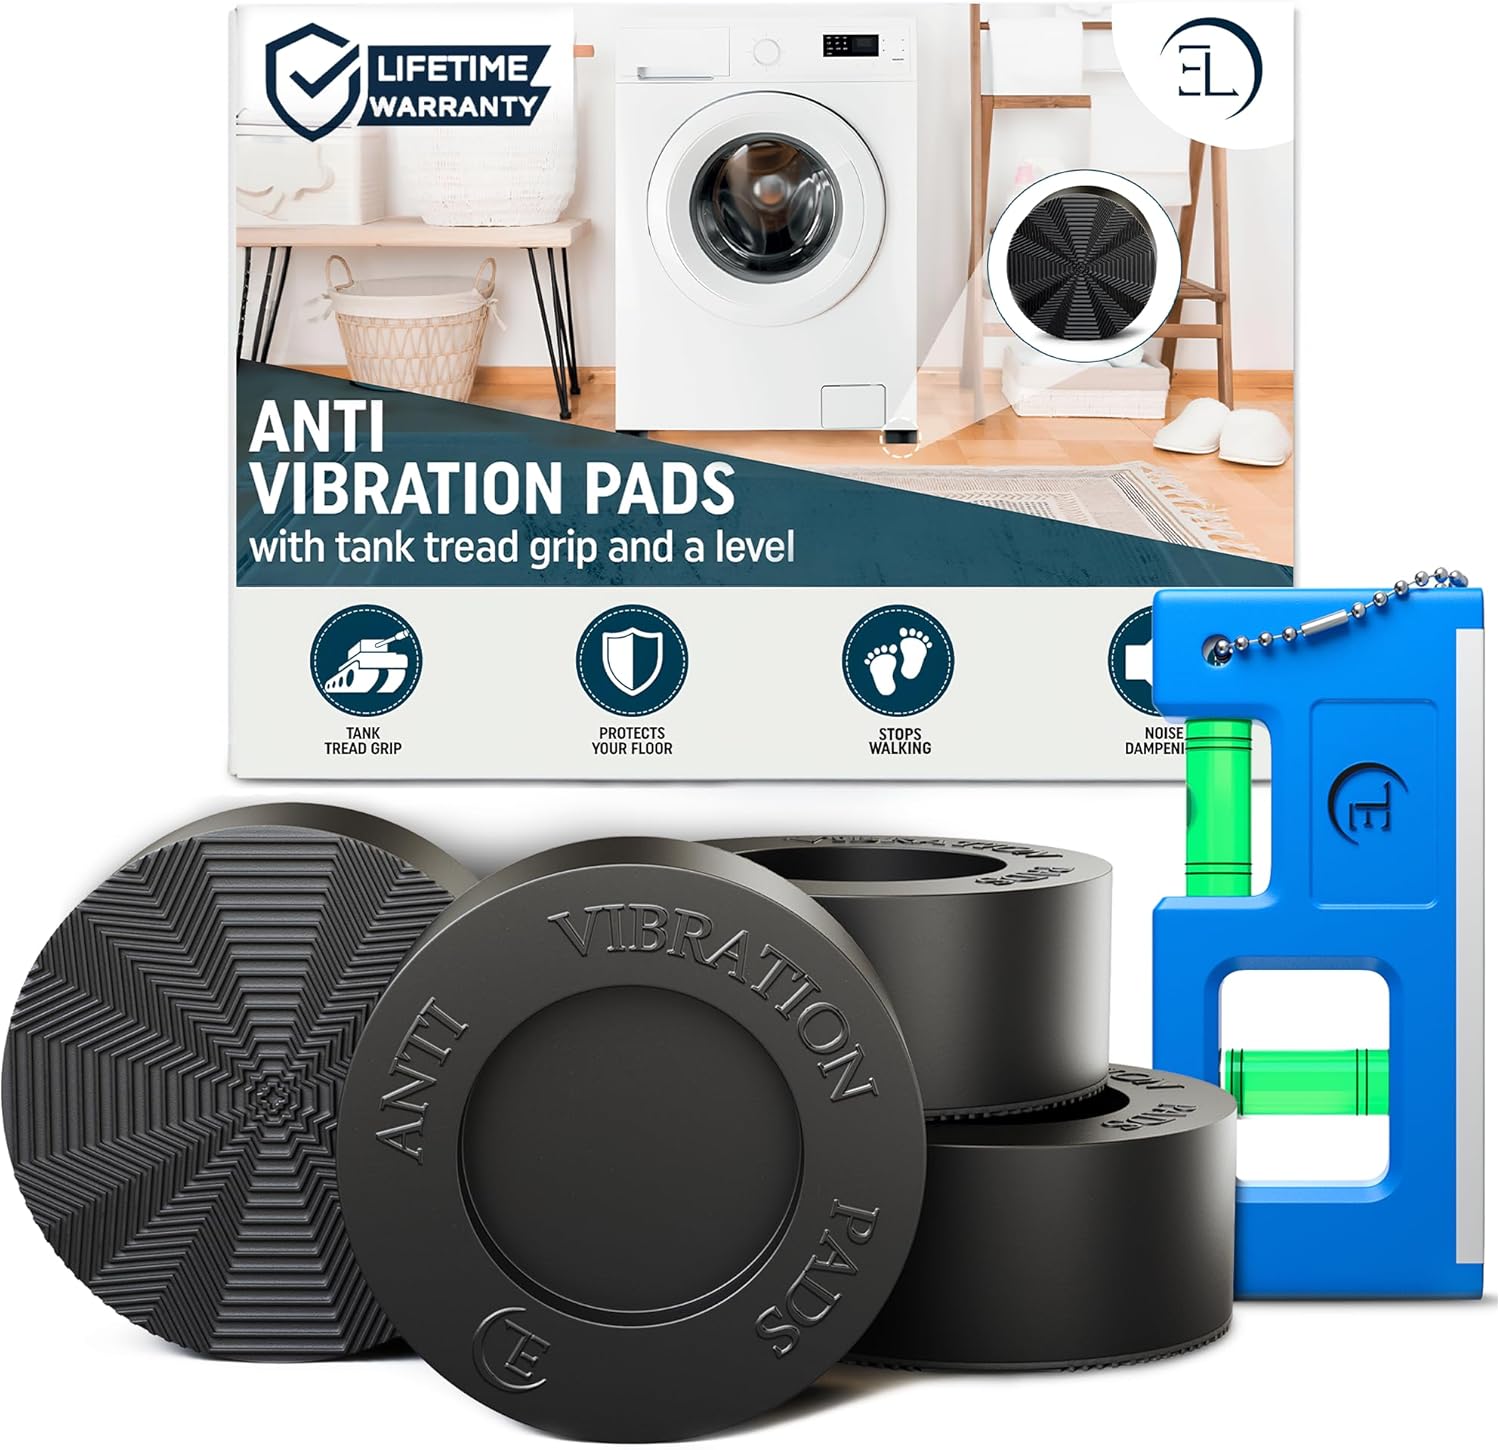
ELEON Anti Vibration Pads
The ELEON set is designed to create a wider, grippier support point beneath each washer or dryer foot while helping reduce movement, vibration transfer, noise, and floor marks.
- Includes 4 anti-vibration pads and 1 magnetic level
- Tank-tread grip pattern helps limit side-to-side movement
- 3-inch total diameter creates a wider base under each foot
- 1.75-inch opening fits many standard appliance feet
- 0.95-inch lift adds grip, clearance, and floor separation
How to Check Whether the Pads Were Installed Correctly
A successful installation should be judged by the complete setup, not by the fact that all four pads are technically beneath the washer.
Every foot is centered
No washer foot should sit partly outside its pad or rest against an edge in a way that creates uneven support.
All four corners feel firmly supported
Push gently on opposite corners. The washer should not pivot or rock from one support point to another.
The machine is still level
Check both directions with the level after the final installation, not only before the pads were fitted.
The washer remains stable during spin
Normal operational vibration may still exist, but the machine should not walk across the floor or shake violently.
Hoses and cables have safe clearance
Nothing behind the machine should be stretched, crushed, pinched, or forced into an unsafe position after the washer is raised and repositioned.
7 Installation Mistakes That Can Make the Pads Less Effective
Installing pads under an unlevel washer
Pads should improve an already stable setup. They should not be used to avoid adjusting the appliance feet.
Leaving one foot partly outside the pad
Uneven support can allow the washer to rock and may transfer weight incorrectly through the base.
Skipping the floor inspection
Moisture, detergent residue, dust, and debris can affect grip. A damaged or unstable floor may also need attention before an accessory is added.
Assuming the washer stayed level after being moved
Positioning the pads can shift the appliance. Always perform a final leveling and rocking check after installation.
Pushing the washer tightly against a wall
Contact with surrounding surfaces can create new noise and vibration. Follow the spacing requirements for your particular appliance.
Testing with a badly unbalanced load
A severely unbalanced load can create movement even when the machine and pads are correctly installed. Use a reasonable load for the first test.
Using pads to hide a mechanical fault
Grinding, scraping, leaking, violent movement, a loose drum, or a sudden major change in vibration should be investigated rather than covered up with an accessory.
What If the Washing Machine Still Shakes After Installing the Pads?
Do not immediately assume that the pads failed. Go back through the washer setup in a logical order.
Check the laundry load
Bulky items, tangled bedding, overloaded drums, and very small unbalanced loads can create excessive movement during the spin cycle.
Check for rocking again
The machine may have shifted during the test. Verify that every foot remains seated correctly and that no corner has become unstable.
Check the level again
Even a small change in support can affect the way the washer behaves at higher spin speeds.
Check whether the movement is actually abnormal
Some vibration during operation is normal. The concern is excessive movement, repeated walking, violent shaking, heavy banging, or a sudden change from the washer's usual behavior.
Stop if there are signs of a repair problem
Persistent violent movement, leaking, scraping, grinding, electrical smells, or obvious internal looseness should be inspected according to the manufacturer's guidance or by a qualified appliance technician.
For a complete diagnosis, read our guides on why a washing machine may shake violently, how to level a washing machine properly, and how to stop a washer from walking during the spin cycle.
Anti-Vibration Pads Work Best After the Basics Are Already Right
Pads are usually most useful when the washer is correctly installed but still transfers vibration through its feet, shifts on a smooth surface, creates noticeable floor noise, or would benefit from a wider and grippier support point.
They are particularly practical when you want a targeted solution beneath the four actual appliance contact points rather than covering the entire floor beneath the washer.
This is also why installation quality matters so much. A pad can only support the foot that is placed on it. It cannot correct a washer that is leaning, rocking, incorrectly installed, or suffering from an internal fault.
Correct installation → stable floor → level washer → no rocking → one pad under every foot → final level check → controlled test cycle.
Installing Washing Machine Anti-Vibration Pads: FAQs
Do I need to level the washing machine before installing anti-vibration pads?
Yes. The washer should be level and firmly supported before the pads are installed. Recheck the level again after the final installation.
Do anti-vibration pads go under all four washing machine feet?
Yes. A complete installation normally uses one pad beneath each of the four support feet so the appliance remains evenly supported.
Should I install the front or rear pads first?
The safest sequence depends on the washer design and access available. The important point is to keep the machine controlled and supported while installing each pair, rather than trying to lift the entire appliance by yourself.
Can I install anti-vibration pads without moving the washer?
Some clearance is needed to position each pad correctly beneath its washer foot. The machine should only be repositioned using a safe method appropriate for its weight and the manufacturer's instructions.
Why does my washer still move after the pads are installed?
Check load balance, leveling, rocking, pad position, floor stability, installation hardware, and possible mechanical problems. Pads cannot correct every cause of washer movement.
Do anti-vibration pads need to be glued to the floor?
Purpose-built appliance pads are generally designed to sit beneath the washer feet without being permanently attached. Follow the instructions supplied with the particular pads you are using.
Can I use the same pads under a dryer?
Many anti-vibration pads are suitable for compatible dryers as well as washers, provided the appliance feet fit correctly and the product is rated for the intended use.
Should I test the washing machine immediately after installation?
Yes. After confirming that the washer is level and stable, run a controlled test cycle and observe the machine as it enters the spin phase.
Install the Pads Under a Stable Washer—not Instead of Fixing One.
Anti-vibration pads are simple to install, but the best result comes from the full process: inspect the washer, eliminate rocking, level it properly, support every foot, and test the finished setup.
Once those basics are right, well-positioned pads can create a wider, grippier contact point beneath each washer foot and help reduce movement, vibration transfer, noise, and floor marks.